
Installing a 36 inch hood vent can transform your kitchen by improving air quality, removing smoke and odors, and reducing grease buildup. Whether you’re upgrading from a smaller hood or installing one for the first time, proper installation is essential for optimal performance and safety. This guide walks you through the process step by step, with practical tips to ensure a smooth installation of 36 inch hood vent.
1. Prepare for Installation
Before you begin, gather the necessary tools and materials. Typical tools include a drill, screwdriver, measuring tape, level, stud finder, and ducting materials. You’ll also need mounting hardware, which is usually provided with the hood vent.
Safety is critical. Turn off power to the kitchen area at the breaker panel and use a voltage tester to confirm that the power is off. If your kitchen has gas appliances, shut off the gas supply as an added precaution.
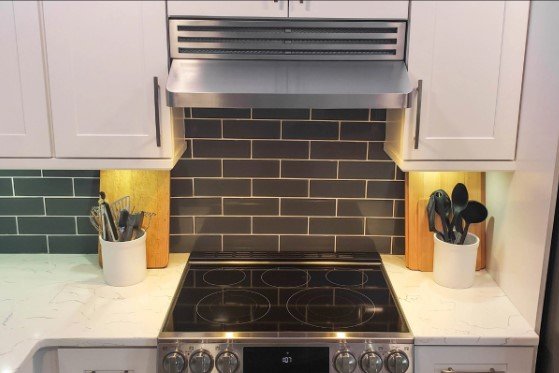
2. Measure and Mark the Location
A 36 inch hood vent should be centered over the cooktop or range. Measure the distance from the floor to the bottom of the hood. Most manufacturers recommend a clearance of 24 to 30 inches above the cooktop for electric ranges and 28 to 36 inches for gas ranges. Check your hood’s installation manual for exact requirements.
Use a level and pencil to mark the outline of the hood on the wall. Next, locate and mark the wall studs using a stud finder. Securing the hood to studs is essential, especially for heavier models. If studs are not in the ideal location, you may need to use toggle bolts or install a backing board.
3. Prepare the Ductwork
Proper ducting is the most important factor for effective ventilation. For a 36 inch hood vent, use the largest duct size recommended by the manufacturer, typically 6 inches in diameter. Avoid using smaller ducting, as it restricts airflow and increases noise.
Plan the duct path to minimize bends and length. The more turns and longer the duct, the lower the airflow and efficiency. If possible, run the duct straight up through the ceiling or out the wall. Use rigid metal ducting rather than flexible ducting to reduce friction and noise.
Cut the duct opening in the wall or ceiling where the vent will exhaust. If you’re venting through the roof, install a roof cap; if venting through the wall, install a wall cap. Seal all duct joints with foil tape to prevent air leaks and improve efficiency.
4. Install the Hood Support
Before hanging the hood, install any required support bracket or mounting template. Many hoods come with a mounting plate that attaches to the wall. Secure the plate to studs or a reinforced backing board. Use a level to ensure the plate is straight, as an uneven mount will cause the hood to sit crooked.
If your hood is heavy, consider having a second person help hold the unit while you attach it to the mounting plate. This step reduces the risk of dropping the hood and ensures a secure installation.
5. Connect the Electrical Wiring
A 36 inch hood vent typically requires a dedicated electrical circuit. Confirm that your home’s wiring meets the manufacturer’s requirements. Most models use a standard 120-volt connection, but some high-powered units may require 220 volts.
Connect the wires according to the installation manual. Typically, you will connect the black (hot) wire to the black wire, the white (neutral) wire to the white wire, and the green or bare wire to the ground. Use wire nuts to secure connections and tuck the wires into the junction box. After wiring, restore power at the breaker and test the hood’s fan and lights.
If you are not comfortable working with electrical wiring, hire a licensed electrician to ensure the installation meets local codes and safety standards.
6. Attach the Hood and Duct
With the mounting plate secured and wiring connected, lift the hood into place. Align the hood with the mounting plate and secure it using the screws provided. Double-check that the hood is level and firmly attached.
Next, connect the duct to the hood’s exhaust outlet. Use a clamp or foil tape to secure the duct connection. Ensure there are no gaps or loose fittings. For best results, support the duct with straps or brackets to prevent sagging.
7. Final Adjustments and Testing
Install the filters and any remaining components, such as the chimney cover or decorative panels. Turn on the hood and test the fan at all speed settings. Check for any unusual noises, vibrations, or air leaks around the duct connections. If the airflow seems weak, inspect the duct path for obstructions or excessive bends.
Conclusion
Installing a 36 inch hood vent insert requires careful planning, accurate measurements, and proper ductwork. By following these step-by-step tips, you can ensure a safe, efficient, and long-lasting installation. Proper ventilation not only improves kitchen air quality but also protects your home from grease buildup and heat damage. When installed correctly, a 36 inch hood vent can provide reliable performance for years to come.